
Jerico D. Catipay - Trento National High School
There are few other things you need to do before publishing your learning materials online. It is assumed that your materials were properly reviewed before uploading. You can find a lot of ways to publish your work in the internet, others used self designed webpage by using different forms of software, but in here, we will use Blogger.com or Blogspot.com as our media to publish our work online.
1. CREATE GMAIL ACCOUNT
Why gmail? We are working on a platform designed by google. Gmail is by far more efficient that any other email provider in the internet that is based on experience. If you already have your gmail account, proceed immediately on signing up at www.dropbox.com.
A Google Account gives you access to Google products like Gmail, Google+, YouTube, and more with a single username and password. A Google Account comes with a Gmail address and a Google+ Profile. Once you create a Google Account, you can use that same username and password to sign in to any Google product
If you've signed in to any Google product before (like Gmail, Google+ or YouTube), you already have a Google Account. You can use the same username and password you created for that product to sign in to any new Google products you'd like to try.
If you can't remember ever signing in and would like to check if you have an account, just enter your email address on the password-assistance page. If there's no Google Account associated with your email address, you'll get a message that says 'No account found with that email address' you entered.
If you forgot your username or password, visit the "Trouble signing in page."
Click this link to start signing up (or type this in your address bar): www.gmail.com, then click create account at the bottom, by the way, you need your cellphone to receive that confirmation code that will be sent by google for you.

You have to complete all the required fields in the form and please don't forget the password you have entered, write your password in your notebook for future reference.
After successful sign up. You can now use this email account to confirm anything if in case along the way of your work something pop-up and ask you confirm your identity, that is for security purposes.
--------------------------------------------------------------------------------------------------------------------------
Drop box is an online storage system in which you can upload your files in the internet. This system can be installed in your personal computers to upload your file in the internet without opening any graphical user interface (GUI) in a webpage. As long as your personal computers is connected to the internet, the system immediately upload your file from your folder. No hasle.
In here we will do two things:
First: Sign up at www.dropbox.com.
You cannot create a dropbox account if you don't have the email account.
This is how it looks like. Fill in the required information at the lower right of the web page.

Second: Download Dropbox Executable File
After successful sign up, click on this link DROPBOX APPLICATION to download the execution file. If in some cases you cannot download the application, sign in to www.dropbox.com to and upload the material.
How do I add or upload files to my Dropbox?
With Dropbox Desktop Application
After installation on Windows, your new Dropbox folder will be located inside your home folder by default.

--------------------------------------------------------------------------------------------------------------------------
2. CREATE DROP BOX ACCOUNT
Drop box is an online storage system in which you can upload your files in the internet. This system can be installed in your personal computers to upload your file in the internet without opening any graphical user interface (GUI) in a webpage. As long as your personal computers is connected to the internet, the system immediately upload your file from your folder. No hasle.
In here we will do two things:
First: Sign up at www.dropbox.com.
You cannot create a dropbox account if you don't have the email account.
This is how it looks like. Fill in the required information at the lower right of the web page.
Second: Download Dropbox Executable File
After successful sign up, click on this link DROPBOX APPLICATION to download the execution file. If in some cases you cannot download the application, sign in to www.dropbox.com to and upload the material.
How do I add or upload files to my Dropbox?
With Dropbox Desktop Application
First, make sure you install the Dropbox desktop application. It creates a new folder on your computer called Dropbox (or two separate folders if you're a Dropbox for Business user and have connected your personal and work accounts). Your Dropbox folder works just like any other folder on your hard drive, except everything in your Dropbox folder automatically syncs to the web and to any other computer with Dropbox installed. Drop your files in your Dropbox folder
It's easy to add files to Dropbox. Move your files into your Dropbox by dragging and dropping them into your Dropbox folder. That's it. The files in your Dropbox folder will automatically be synced online and to your other computers. You don't have to do anything. You can even use the Save As... menu option in most applications to save files directly to your Dropbox folder.
Drag your files directly into your Dropbox
Understanding Dropbox syncing icons (Only for computers with Dropbox Desktop Application Installed)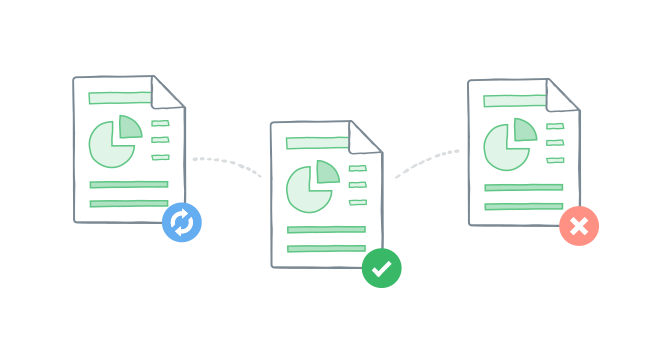
Because you save your files on drobox's website and make them accessible on your other devices, they add status icons to your files and folders so you know the application is working.
Here's what each of these icons means:
- Green check: All your files are saved on your dropbox account and accessible from any device.
- Blue arrows: Your files are in the process of being saved to your dropbox account and your other devices. The speed of your Internet connection, the size of the files, and the number of files all affect how long this takes. Please be patient!
- Red X: Something isn't working properly and your files are not being synced. Give it some time and check the status later. In most cases, the problem will fix itself, but if it persists, contact your admin. Sometimes it indicates that you account is full, unless you subscibed for a business version.
On the Dropbox website
- Sign in to the Dropbox website.
- Click the Upload button from the very top of the window.

- A window will appear. Click the Choose files button and then select the file(s) on your computer that you'd like to add to your Dropbox.
Your files will begin uploading automatically, and you'll be shown a progress indicator.
Note: Each file you upload through the website must be 10 GB or less. For even larger files, use the desktop application or mobile app, which don't have this limit.
Your stuff is always there, even if you're offline.
Dropbox is better than a network drive. Files in your Dropbox stay on your computer's hard drive, so you can always access your files even if you are offline. Dropbox works in the background and will automatically sync any new changes the next time you are online.
Your email and dropbox account are the two main applications you need to publish your learning materials in the internet. If you have the two systems at hand then you are now ready to make your own blog. For the easiest way to share something online, we will use blogspot.com as our main platform. There's a lot of things you need to explore at blogspot.
-------------------------------------------------------------------------------------------------------------------------
3. CREATE BLOGSPOT ACCOUNT
Having a blog is great because you can share any digital products you have. It will help you reach your students at home. You can post any digital files to carry the goal in learning your subject.
Contents
- Create a blog
- Dashboard
- Overview
- Write a post
- Add an image
- Add a video
- Customize
- Privacy and permissions
To start making your own blog, proceed to www.blogger.com, you have to use your gmail account to sign in.To start using Blogger, simply sign in with your Google Account. (If you use Gmail, Google Groups, you already have an account.) If you don't have a Google Account yet, you can create one now.
3.1 Create a blog
To start a blog with Blogger, visit the Blogger homepage, enter your username and password, and click Sign in. Enter a display name and accept Blogger's Terms of Service. Then click the Create a Blog link and get started!
Pick an address (URL) and a blog title. Then, choose your favorite blog template (this is how your blog will look when you publish it). Now get creative, add information to your personal profile, and customize how your blog looks, if you feel up to it. Start blogging now!

Your Dashboard, as always, is your starting point. This is where all your blogs are listed, and you can click on the icons next to them to perform various actions on each blog, such as:
- Writing a new post: Just click on the orange Pencil icon on your Dashboard to access the Post Editor.
- Viewing your posts: The gray Post List icon will take you to a list of your published and drafted posts for a specific blog.
- Catching up on your favorite blogs: Below the list of your own blogs, you’ll see a list of the blogs you follow with an excerpt from their latest posts.
- Everything else: Check out the drop-down menu next to the Post List icon for a quick link to:
- Overview
- Posts
- Pages
- Comments
- Stats
- Earnings
- Layout
- Template
- Settings

3.2 Write your post
Once you've signed in to Blogger, you'll see your dashboard with your list of blogs. Here's what you need to do:
- Click the orange pencil icon to write a new post, and enter anything you want to share with the world.
- Next, you'll see the Post Editor page. Start by giving your post a title (optional), then enter the post itself:
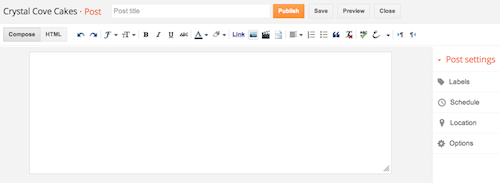
- When you're done, click the Preview button at the top to make sure it's ready to go, and then click the Publish button to publish your post.
3.3 Add an image (Optional)
You can add an image from your computer or the Web to your blog. Click the image icon in the Post Editor toolbar.

A window appears prompting you to browse for an image file on your computer, or enter the URL of an image on the Web.

Once you've selected your image, you can then choose a layout to determine how your image will appear in your post:

A window appears prompting you to browse for an image file on your computer, or enter the URL of an image on the Web.

Once you've selected your image, you can then choose a layout to determine how your image will appear in your post:
- The 'Left', 'Center', and 'Right' options allow you to customize the way your blog text will flow around your image.
- The 'Image size' options will determine how large the image will appear within your post.
Click UPLOAD IMAGES to add your image, and then click DONE when the notification window appears telling you that 'Your image has been added.' Blogger will then return you to the post editor, where you'll see your image ready to be published to your blog.
You can also publish images to your blog using your mobile device.
3.4 Add a video (Optional)
To add a video to your blog post, click the film strip icon in the Post Editor toolbar above where you compose your blog text. A window appears prompting you to 'Add a video to your blog post.'
Click Browse to select the video file from your computer that you'd like to upload. Note that Blogger accepts AVI, MPEG, QuickTime, Real and Windows Media files and that your video must be less than 100MB in size.
Before uploading your video, add a title in the 'Video Title' box and agree to the Terms and Conditions (you'll only have to do this the first time that you upload a video with Blogger). Then click UPLOAD VIDEO.
While your video uploads, you'll see a placeholder in the post editor showing where your video will appear. You'll also see a status message below the post editor letting you know that your upload is in progress. Depending on the size of your video, this usually takes about five minutes. When it is complete, your video will appear in the post editor.
3.5 Customize
Your template is a fun way to customize your blog. When creating a new blog, you're first asked to choose a default template, this is the basic design of your blog. You can choose from many templates for your blog; simply pick the one that best fits your needs.
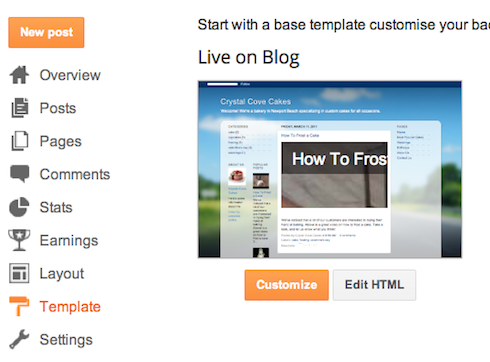
Once on the Template tab, you can either click on the orange Customize button to get started with our easy-to-use WYSIWYG (“What you see is what you get”) template designer, or choose one of our many default templates. If you’d like to edit the HTML of your blog, just click the gray Edit HTML button.
In addition, you can customize your blog's design using our intuitive drag-and-drop interface. You can also add powerful gadgets such as slideshows, user polls. If you want more precise control over your blog's layout, you can also use the Edit HTML feature. To edit your blog's layout, follow these steps:
- Click Layout from the drop-down menu on your dashboard below the blog you would like to customize.

- From there, click Edit to edit existing gadgets, or Add a Gadget to add new ones.
- To add a new gadget after you've clicked Add a Gadget, simply click the plus sign next to your desired gadget. You can choose from gadgets by category, or search for a specific gadget in the top right of the pop-up window.


Once you've added the necessary information to your selected gadget, click the orange Save arrangement button. Your layout changes will appear instantly.
------------------------------------------------------------------------------------------------------------------


Different options will pop up: share, download, delete, rename, move, copy, and create album. You can explore on this link later.
3. Now click the link share (with that of a rainbow color). You can two options that is "invite people to collaborate and send link" in this case click send link
4. After clicking on the link, another window will pop up which will give you the link for that file. Since you need to integrate it in your blog just simply copy the link of the URL and link it to the word or phrase you like in your blog post.

5. Select a certain phrase in your blog post by highlighting it, then look for that button at the upper part of the window that says "Link". Before clinking on that make it sure that you were able to highlight the phrase or the word which you want your file be connected.

6. Paste the copied link to that Web Address Box and don't forget to check the "Open the link in a new window". Then click ok.
7. After doing the link, make sure you have updated your post by clicking on the the orange button with the word UPDATE this is to make sure that changes were saved.
Try to clicnk on this LINK to see how it looks like. There is a big download button at the upper right corner of the page for your student to download it. Your SIM must be in pdf format.

Now try to view your website and play on it and do some modifications if necessary. Done!
Note: Please send to me the link of your blog for checking. Thank you!
------------------------------------------------------------------------------------------------------------------
4. INTREGRATING DROPBOX CONTENT IN YOUR BLOG
Now lets go back to dropbox account.
1. Sign in to your dropbox account at www.dropbox.com then go to your files you want to be integrated in your blog.

2. What we can do in here is that we can share the entire contect of your file in your blog, from notepad file to a larger file. Simply hover your pointer to the file and a share link will pop up then right click on it.

3. Now click the link share (with that of a rainbow color). You can two options that is "invite people to collaborate and send link" in this case click send link
4. After clicking on the link, another window will pop up which will give you the link for that file. Since you need to integrate it in your blog just simply copy the link of the URL and link it to the word or phrase you like in your blog post.

5. Select a certain phrase in your blog post by highlighting it, then look for that button at the upper part of the window that says "Link". Before clinking on that make it sure that you were able to highlight the phrase or the word which you want your file be connected.

6. Paste the copied link to that Web Address Box and don't forget to check the "Open the link in a new window". Then click ok.
7. After doing the link, make sure you have updated your post by clicking on the the orange button with the word UPDATE this is to make sure that changes were saved.
Try to clicnk on this LINK to see how it looks like. There is a big download button at the upper right corner of the page for your student to download it. Your SIM must be in pdf format.

Now try to view your website and play on it and do some modifications if necessary. Done!
Note: Please send to me the link of your blog for checking. Thank you!
No comments:
Post a Comment